One of my goals with this blog is to utilize some of my skills that I went to school for in this blog...that means that I would like to incorporate some videos that have been edited ect. This video was taken on my cell phone in a last minute thought to start working towards this goal. I didn't edit it, I didn't script any of this out and I am wearing my workout clothes and all. My future videos will be much better.
Regardless of how cavemanish this video is...I love my guac recipe. It is so damn good. I have never found a better recipe yet. You need to make this right now and get it into your face! Trust me. So please excuse my kitchen mess and the awkwardness of this video and make yourself some guacamole!
Guacamole
Ingredients
2 Avocado (Mashed with a fork
1 1/2 tbsp. Lemon Juice
1 tsp. salt
1/2 tsp. pepper
1 bunch ringed and chopped cilantro (no stems)
2/3 tomato (Diced)
1/4 small onion (Diced)
1/8 tsp. Garlic powder
Directions
Mash avocado in a bowl with a fork with lemon juice. Once mashed add salt, pepper, cilantro, tomato, onion and garlic. Stir until combined. Taste and adjust seasoning, if necessary. (Typically if I add anything it is a bit more salt and lemon juice) Serve!
If you are going to have this out for a bit, I add another splash of lemon juice to the top to reduce browning.
To store leftovers in the fridge, scrape the sides of the bowl down and add another splash of lemon juice. Place plastic wrap directly against the guacamole.
© Kim Bohme and A Bohme Cooked Meal
A Bohme Cooked Meal
Sunday, March 30, 2014
Friday, March 28, 2014
Almond Cake
I am on a quest. There is a restaurant in town called Ariana and they have an almond cake called Almondrado Cake. Eating that cake brought me closer to heaven and it made me a better person just by eating it. I am on a never ending quest for recreating that cake!
This cake is not a perfect match but it is damn good. I love how this cake is mostly made up of ground almonds and was insanely moist. It makes me feel like I am eating something healthy!


Almond Cake
(slightly adapted from Delicious Wordflux)
Preparation time: 20 minutes
Cook time: 45 minutes
Serves 12
12 tablespoons (1 1/2 sticks) unsalted butter, at room temperature (plus a little more for greasing the pan) Flour, for coating the pan
3 cups whole almonds (with skin)
1 1/4 cups sugar
4 large yolks
4 teaspoons grated lemon zest
1/4 teaspoon salt
1/2 teaspoon cinnamon
1 teaspoon almond extract
4 large egg whites
Position the rack in the middle of the oven and pre-heat to 350°F. Line the bottom of a 10-inch springform pan with parchment paper, and grease the paper and the sides of the pan. Coat the pan with flour and tap out the excess.
Press the almonds and 1/4 cup of the sugar in a food processor until the consistency of fine cornmeal. Add the butter and pulse to combine. Set aside.
In the bowl of a stand mixer fitted with the paddle attachment, or with a handheld mixer in a big bowl, beat 3/4 cup plus 2 tablespoons of the sugar and the yolks on medium-high until very light and fluffy, about 7 minutes. Add the zest, salt, and cinnamon and mix until incorporated. Whirl in the almond mixture and almond extract.
In an impeccably clean bowl, whisk the egg whites until foamy then slowly whisk in the remaining 2 tablespoons of sugar until the whites form soft, luscious peaks. Drop a scoop of the egg whites into the almond mixture and stir to lighten. Carefully fold in the remainder of the whites until no streaks show. Spoon the batter into the pan and smooth the top.
Bake until the cake is golden brown and begins to pull away from the sides of the pan, about 45 minutes. Transfer to a rack and let rest for 10 minutes before releasing the cake from the pan.
Serve with whipped cream and strawberries.
© Kim Bohme and A Bohme Cooked Meal
This cake is not a perfect match but it is damn good. I love how this cake is mostly made up of ground almonds and was insanely moist. It makes me feel like I am eating something healthy!

This is right out of the oven!

This is dressed for eating.
(slightly adapted from Delicious Wordflux)
Preparation time: 20 minutes
Cook time: 45 minutes
Serves 12
12 tablespoons (1 1/2 sticks) unsalted butter, at room temperature (plus a little more for greasing the pan) Flour, for coating the pan
3 cups whole almonds (with skin)
1 1/4 cups sugar
4 large yolks
4 teaspoons grated lemon zest
1/4 teaspoon salt
1/2 teaspoon cinnamon
1 teaspoon almond extract
4 large egg whites
Position the rack in the middle of the oven and pre-heat to 350°F. Line the bottom of a 10-inch springform pan with parchment paper, and grease the paper and the sides of the pan. Coat the pan with flour and tap out the excess.
Press the almonds and 1/4 cup of the sugar in a food processor until the consistency of fine cornmeal. Add the butter and pulse to combine. Set aside.
In the bowl of a stand mixer fitted with the paddle attachment, or with a handheld mixer in a big bowl, beat 3/4 cup plus 2 tablespoons of the sugar and the yolks on medium-high until very light and fluffy, about 7 minutes. Add the zest, salt, and cinnamon and mix until incorporated. Whirl in the almond mixture and almond extract.
In an impeccably clean bowl, whisk the egg whites until foamy then slowly whisk in the remaining 2 tablespoons of sugar until the whites form soft, luscious peaks. Drop a scoop of the egg whites into the almond mixture and stir to lighten. Carefully fold in the remainder of the whites until no streaks show. Spoon the batter into the pan and smooth the top.
Bake until the cake is golden brown and begins to pull away from the sides of the pan, about 45 minutes. Transfer to a rack and let rest for 10 minutes before releasing the cake from the pan.
Serve with whipped cream and strawberries.
© Kim Bohme and A Bohme Cooked Meal
Wednesday, March 19, 2014
Blueberry Breakfast Cake
We recently had friends over to our house and I had to find something to feed them with in the morning. I made this the night before and it was ready for them when they woke up in the morning. This cake was moist and there was a delightful tang from the lemon and buttermilk. The texture of this was dence and flakey and with each bite of cake you get bursts of blueberry. The top of this cake is crunchy from the sugar! This cake is a winner.

Buttermilk-Blueberry Breakfast Cake
Adapted from Alexandrea Cooks
Serves 6-8
½ cup unsalted butter, room temperature
2 tsp. lemon zest or more — zest from 1 large lemon
7/8 cup + 1 tablespoon sugar (Seperated)
1 egg, room temperature
1 tsp. vanilla extract
1/2 tsp. almond extract
2 cups flour (set aside 1/4 cup of this to toss with the blueberries)
2 tsp. baking powder
1 tsp. kosher salt
2 cups fresh blueberries
½ cup buttermilk
1. Preheat the oven to 350ºF. Cream butter with lemon zest and 7/8 cup of the sugar until light and fluffy.
2. Add the egg and both extracts and beat until combined. Meanwhile, toss the blueberries with ¼ cup of flour, then whisk together the remaining flour, baking powder and salt.
3. Add the flour mixture to the batter a little at a time, alternating with the buttermilk. Fold in the blueberries. The batter will be VERY thick!
4. Grease a 9-inch square baking pan (or something similar) with butter or coat with non-stick spray. Spread batter into pan. Sprinkle batter with remaining tablespoon of sugar. Bake for 35 to 45 minutes. Check with a toothpick for doneness. If necessary, return pan to oven for a couple of more minutes. (Note: Baking for as long as 10 minutes more might be necessary.) Let cool at least 15 minutes before serving.
© Kim Bohme and A Bohme Cooked Meal
Wednesday, March 12, 2014
Braided Spaghetti Bread

YUMMMY!
Although I am not a huge pasta person I really do enjoy spaghetti
and garlic bread once in a while. Last summer when we went camping I made spaghetti
pudgy pies with garlic bread as the bread.
It was so delicious instead of the hot dogs you typically eat when
camping.
Anyways, when I was on Pinterest I saw this recipe and I
knew I had to make this fancier version the traditional spaghetti.
Remember that you have to thaw the loaf of dough (found in
the freezer section of your grocery store) before making this dish.The bread is crispy and garlicky and the inside was warm and
cheesy. It was perfect!
It was quite impressive looking and can easily serve 6-8
people. Most importantly this was super tasty. If I
ate pasta on a regular basis I would roll this into the rotation. I will however use this for entertaining
friends and family.

Before I braided the bread.

The finished product
Braided Spaghetti Bread
Ingredients
1 Loaf Rhodes™ Bread Dough, thawed to room temperature
6 ounces spaghetti, cooked
1 cup cooked seasoned ground beef (seasoned with salt and pepper)
1 regular jar thick spaghetti sauce
8 ounces mozzarella cheese, cut into 1/2-inch cubes
1 egg white, beaten
1 clove Garlic (Minced)
1 tsp garlic powder
1 tablespoon butter
Parmesan cheese
Instructions
2. Roll loaf or combined dinner rolls into a 12x16-inch rectangle.
3. Cover with plastic wrap and let rest 10-15 minutes.
4. Cook spaghetti according to package instructions.
5. Drain and let cool slightly.
6. Remove wrap from dough.
7. Place spaghetti lengthwise in a 4-inch strip down center of dough.
8. Mix sauce and meat together.
9. Top with cheese cubes.
10. Make cuts 1 1/2-inches apart on long sides of dough to within 1/2-inch of filling.
11. Begin braid by folding top and bottom strips toward filling.
12. Then braid strips left over right, right over left.
13. Finish by pulling last strip over and tucking under braid.
14. Lift braid with both hands and place on a large, sprayed baking sheet.
15. Combine both types of garlic and melted butter, set aside. Take an egg and crack it into a bowl and whisk.
16. Brush bread braid with egg white and garlic butter and sprinkle with Parmesan cheese.
17. Bake at 350°F 30-35 minutes or until golden brown.
18. Cool slightly and slice to serve.
ENJOY!
© Kim Bohme and A Bohme Cooked Meal
Sunday, March 9, 2014
Tortellini Soup

Every person/family needs one of those go to meals. After a hard day’s work and exercising, the
last think I want to do is slave away in the kitchen cooking something
elaborate. This soup fixes that. It is so simple yet is packed with
flavor. The original recipe called for
only diced tomatoes and spinach but I added corn and carrots so that it felt a
bit more rounded in the veggie arena. I
also added alot more chicken broth so after the tortellini absorbs and when you
eat this soup for leftovers it is still a soup and not a pasta salad.
All I can say is you need to try this soup. It’s simple, complex and so comforting!

Tortellini Soup
Adopted from Annie’s Eats
INGREDIENTS
1 tbsp. olive oil
1 cup onion, chopped
2 cloves garlic, minced
1 tsp. dried oregano
1 (15 oz.) can diced tomatoes, with juices
12 cups chicken broth
9 oz. tortellini, any variety
1 cup carrots (shredded)
1 cup corn ( I used frozen)
3 cups fresh baby spinach, loosely packed
Salt and pepper
Grated Parmesan, for serving (Optional)
DIRECTIONS
In a large pot or Dutch oven, heat the olive oil over medium-high heat. Add the onions to the pan and cook until beginning to soften, about 5 minutes. Add in the garlic and cook, stirring frequently, just until fragrant, about 1 minute. Mix in the oregano, corn, carrots and diced tomatoes. Add the broth to the pot. Bring the mixture to a boil. Add the tortellini to the pot and cook according to the package directions. One minute before the tortellini is fully cooked, stir in the spinach. Remove from the heat. Season with salt and pepper to taste. Serve warm with grated Parmesan as desired.
© Kim Bohme and A Bohme Cooked Meal
Saturday, March 1, 2014
Unicorns
Sports. I don’t follow them to much. I watch the Super Bowl every year and that’s about it. I really love to watch hockey in person…but don’t watch games on a regular basis. There is one sport that I adore and enjoy playing, watching and officiating called roller derby. Roller Derby has changed my life. I watched my first bout before I moved to Oregon and I was hooked. I knew right off the bat that this was the first sport in my life that I was meant to participate in.
It took a while for me to relearn how to skate but I love the group of people that I have been adopted into. I can travel to other states and have an automatic group of friends who are willing to help out.
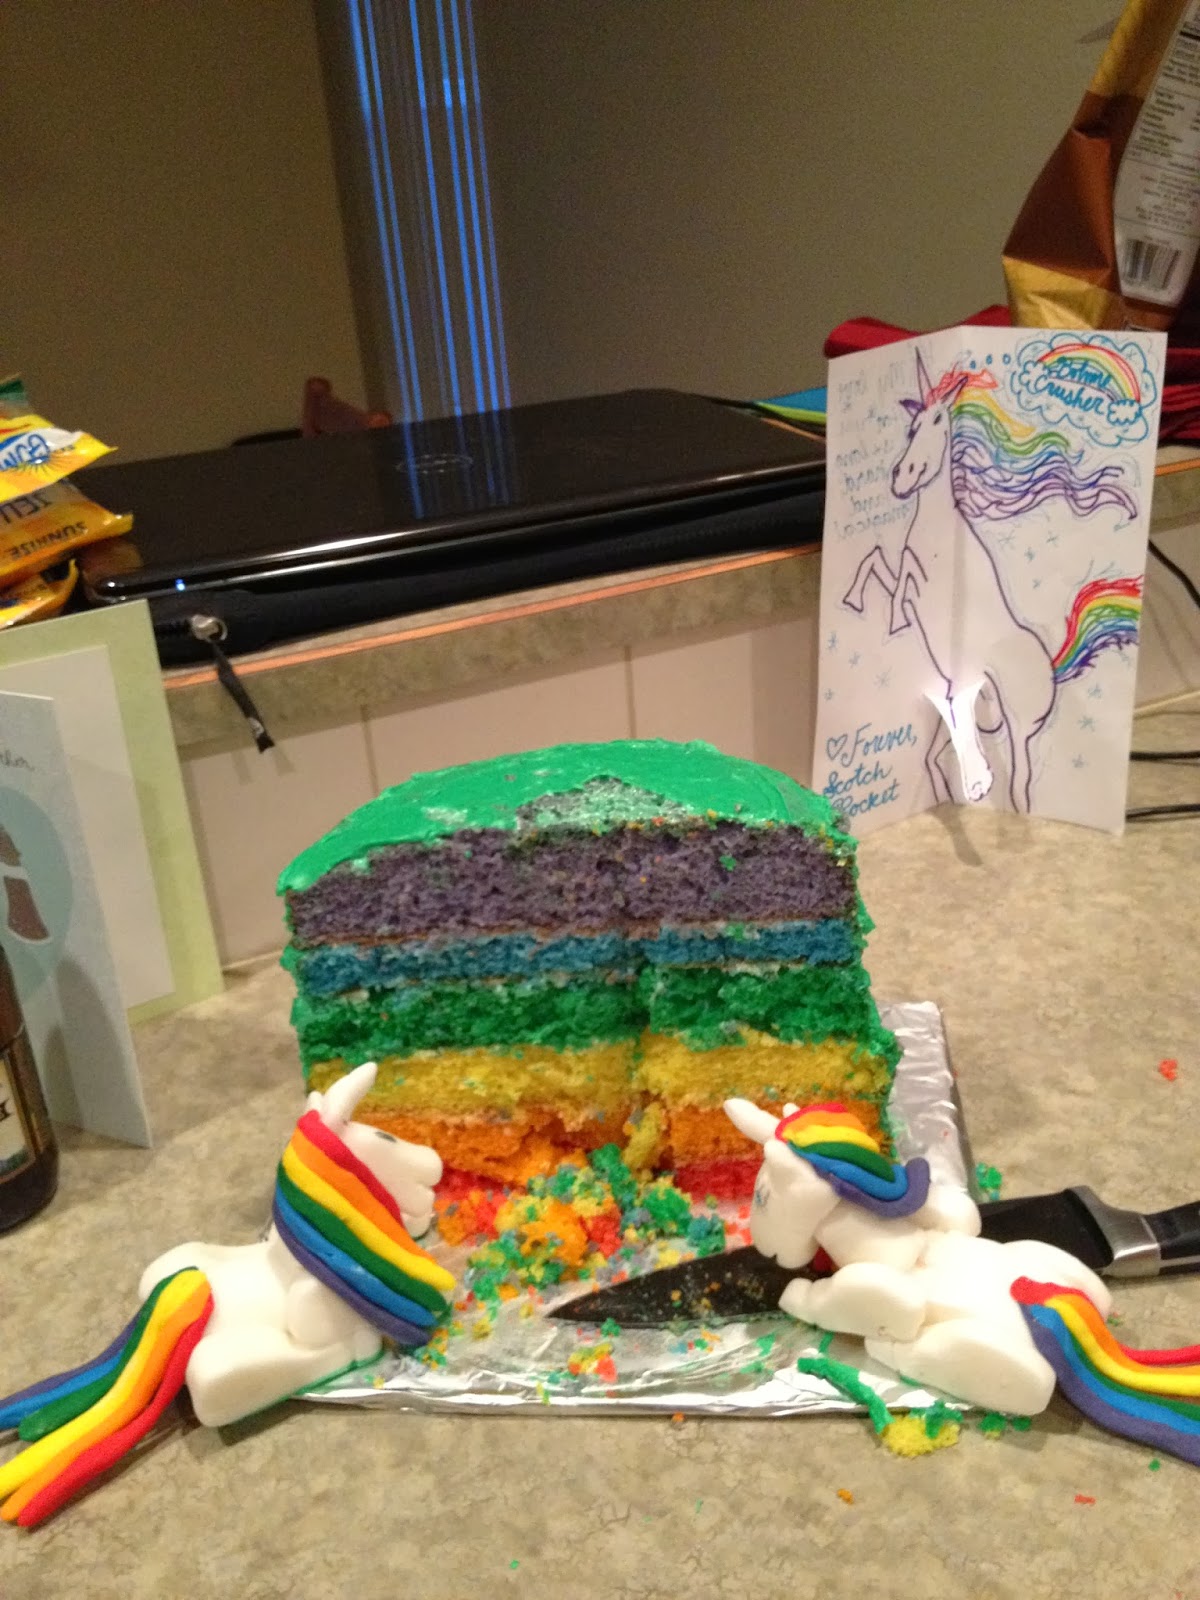
How do unicorns play into this post about unicorns?
I actually made a rainbow cake with fondant for our derby wife wedding ceremony and have also made unicorn poop for our officials crew. They kind of go hand in hand to me. So thank you roller derby for introducing this magical creature into my life.
Rainbow Unicorn Cake (adapted from Serious Eats)

• 2 batches of your favorite vanilla or yellow cake batter, 9x9-inch pan yield (I used boxed cake mix)
• Food coloring gel (like these) Red, Orange, Yellow, Green, Blue, Purple
For the frosting:
• 4 sticks (2 cups) unsalted butter, softened
• 12-14 cups confectioners' sugar, sifted
• 1/4 cup heavy cream, plus 2 tablespoons
• 3 teaspoons vanilla extract
• Food Coloring Gel- Green for the grassy feel
• Fondant (for the unicorns)
Procedures
Preheat the oven as specified in your cake recipe. Line six round cake pans (8- or 9-inch) with circles of parchment paper. If you don’t have six pans (it’s OK, neither do I), line as many as you have; you can bake this in a few batches.
Divide the batter between six separate bowls. Add food coloring to each of the bowls of batter: red, orange, yellow, green, blue, and violet. Be very liberal with the food coloring, as the colors will fade slightly during baking. Pour the batter into the prepared pans and bake. Since these cakes are fairly thin, keep an eye on the baking time—it will be significantly less than if you were baking all of the batter as a single layer cake. Once baked, remove the cakes from the pans and set them on wire racks to cool.
While you wait for the cakes to cool, prepare the frosting. In the stand mixer with the paddle attachment, mix the butter on medium speed until it is very fluffy. Add 4 cups of the confectioners’ sugar, and mix on low speed until smooth and incorporated. Pause to scrape down the sides of the bowl, and add the cream and vanilla. Beat on medium speed until smooth and creamy, 3 to 5 minutes, continuing to add more sugar, cup by cup, until it has reached your desired spreading consistency. If your frosting becomes too stiff, you can thin it by adding more cream, but be careful to add the cream in small (teaspoon) increments so that the frosting does not become too thin.
Place the violet layer on a serving plate and top with a dollop of frosting. Do not spread it to the edges, as the weight of the succeeding layers will flatten the frosting. Repeat with the remaining layers until they are stacked from bottom to top: violet, blue, green, yellow, orange, and red on top.
Chill the cake for at least 20 minutes; it will help it firm up and be easier to frost. Using an offset spatula, apply a thin crumb coat of frosting to all of the cake surfaces. Return the cake to the refrigerator for about 30 minutes so that the crumb coat becomes firm. Remove from the refrigerator and apply the rest of the frosting. Keep the cake chilled until 30 minutes before serving.
Unicorn Poop
I used this as my recipe http://www.instructables.com/id/Unicorn-Poop/
I used food coloring gels to dye the cookies and omitted the pearls.
These were super cute and fun and everyone enjoyed the silliness of it. They were a bit time consuming but totally worth it.


How do unicorns play into this post about unicorns?
I actually made a rainbow cake with fondant for our derby wife wedding ceremony and have also made unicorn poop for our officials crew. They kind of go hand in hand to me. So thank you roller derby for introducing this magical creature into my life.
Rainbow Unicorn Cake (adapted from Serious Eats)
• 2 batches of your favorite vanilla or yellow cake batter, 9x9-inch pan yield (I used boxed cake mix)
• Food coloring gel (like these) Red, Orange, Yellow, Green, Blue, Purple
For the frosting:
• 4 sticks (2 cups) unsalted butter, softened
• 12-14 cups confectioners' sugar, sifted
• 1/4 cup heavy cream, plus 2 tablespoons
• 3 teaspoons vanilla extract
• Food Coloring Gel- Green for the grassy feel
• Fondant (for the unicorns)
Procedures
Preheat the oven as specified in your cake recipe. Line six round cake pans (8- or 9-inch) with circles of parchment paper. If you don’t have six pans (it’s OK, neither do I), line as many as you have; you can bake this in a few batches.
Divide the batter between six separate bowls. Add food coloring to each of the bowls of batter: red, orange, yellow, green, blue, and violet. Be very liberal with the food coloring, as the colors will fade slightly during baking. Pour the batter into the prepared pans and bake. Since these cakes are fairly thin, keep an eye on the baking time—it will be significantly less than if you were baking all of the batter as a single layer cake. Once baked, remove the cakes from the pans and set them on wire racks to cool.
While you wait for the cakes to cool, prepare the frosting. In the stand mixer with the paddle attachment, mix the butter on medium speed until it is very fluffy. Add 4 cups of the confectioners’ sugar, and mix on low speed until smooth and incorporated. Pause to scrape down the sides of the bowl, and add the cream and vanilla. Beat on medium speed until smooth and creamy, 3 to 5 minutes, continuing to add more sugar, cup by cup, until it has reached your desired spreading consistency. If your frosting becomes too stiff, you can thin it by adding more cream, but be careful to add the cream in small (teaspoon) increments so that the frosting does not become too thin.
Place the violet layer on a serving plate and top with a dollop of frosting. Do not spread it to the edges, as the weight of the succeeding layers will flatten the frosting. Repeat with the remaining layers until they are stacked from bottom to top: violet, blue, green, yellow, orange, and red on top.
Chill the cake for at least 20 minutes; it will help it firm up and be easier to frost. Using an offset spatula, apply a thin crumb coat of frosting to all of the cake surfaces. Return the cake to the refrigerator for about 30 minutes so that the crumb coat becomes firm. Remove from the refrigerator and apply the rest of the frosting. Keep the cake chilled until 30 minutes before serving.
Unicorn Poop
I used this as my recipe http://www.instructables.com/id/Unicorn-Poop/
I used food coloring gels to dye the cookies and omitted the pearls.
These were super cute and fun and everyone enjoyed the silliness of it. They were a bit time consuming but totally worth it.
(Image from http://www.juxtapost.com/site/permlink/d32d6000-9745-11e1-bc9f-03c60b09d7ca/post/unicorns_scoot_rainbows_/)
© Kim Bohme and A Bohme Cooked Meal
Subscribe to:
Posts (Atom)